
Export ProRes Codec from Adobe Premiere Pro on Windows

Have a project in Adobe Premiere Pro. Now I want to export ProRes codec from Premiere Pro on Windows PC. The problem is, Adobe Premiere Pro lacks support for Apple ProRes on Windows PC. So, any workaround?
Looking around for any decent tutorials, I got a solution. To get ProRes from Windows Premiere, I need is a ProRes encoder for Windows. The highly recommended tool is Brorsoft Video Converter, an excellent ProRes encoder for Windows.
It supports converting MTS, AVI, WMV, MKV, FLV, MXF, MP4, VOB, XAVC(S), etc video files to all variants of ProRes: ProRes 422, Prores 422 LT, ProRes 422 HQ and ProRes 422 Proxy. With the help of the best ProRes converter app for Windows, you can export ProRes from Avid Media Composer, Adobe Premiere, After Effects, Sony Vegas on Windows PC with ease.
Main Features of the Top ProRes Converter for Windows:
– Provide all variants ProRes codecs as outputs
– Convert 250+ video and audio formats in SD/HD/4K
– 30X faster conversion speed and high output quality
– 150+ ready presets for iPhone, iPad, Samsung Galaxy Tab and other mobile devices
– Support batch conversion – convert multiple files at the same time
– Edit and touch up your video in clicks (e.g. trimming, cropping, inserting SRT/ASS/SSA subtitle, etc)
– Support H.265/HEVC Encode & Decode
How to Export ProRes Codec from Premiere on PC
Step 1. Export lossless MOV from Premiere Pro.
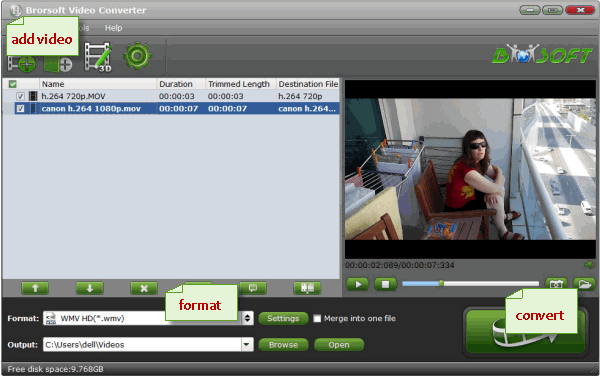
Step 2. Launch the ProRes converter for Windows, and you can either click "Add" button to import your videos files, or directly drag and drop the files into this program.
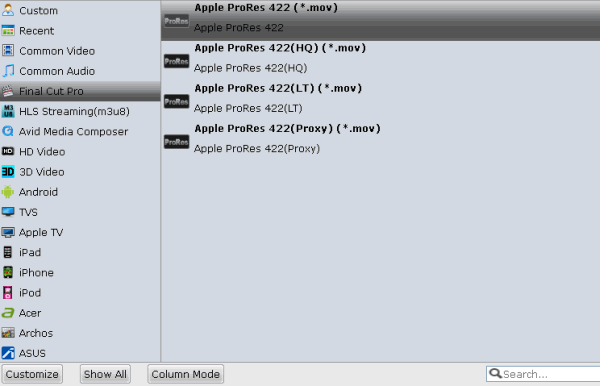
Ste 3. This Windows ProRes encoder offers optimized ProRes formats including Apple ProRes 422(*.mov), Apple ProRes 422(HQ) (*.mov), Apple ProRes 422(LT) (*.mov), and Apple ProRes 422(Proxy) (*.mov). Choose one as you need.
Tip: If the default settings do not fit you requirement, you can click "Settings" icon to and enter "Profile Settings" panel to adjust video size, bit rate, frame rate, sample rate and audio channels.
Step 4. Click "Convert" button to start encoding videos to ProRes 422, ProRes 422 HQ, ProRes 422 LT, ProRes 422 Proxy for using, editing, playing on Windows PC.
Related Guides:
Edit Blackmagic Ursa Mini Pro 4.6k Files in Adobe Premiere Pro
Edit Yuneec q500 Typhoon 4K in Adobe Premiere Pro
Autel Robotics x-Star Premium 4k to Premiere Pro Workflow
How to Import Gopro Hero3 4k to Premiere Pro


Comments
Post a Comment